

Caring For Your Kutzall
Thanks to our exclusive coatings and unparalleled quality of materials, Kutzall tools are acclaimed for staying cleaner and lasting longer than their traditional counterparts. But, like every well-used tool, eventually it will need maintenance.
Cleaning and caring for your Kutzall is an easy, straightforward process. Depending on the material you’re carving there are two ways to clean your tool, 1) burning 2) soaking.
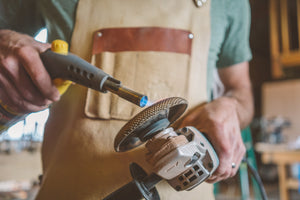
Burning
For wood only
What you'll need: A well used Kutzall tool, butane or propane torch, fine hand wire brush, dusk mask or respirator, leather gloves, eye protection, water or a fire extinguisher on standby for safety.
BURNING STEP-BY-STEP
1. Set-up in a well ventilated area.
2. Unplug the power source and remove your Kutzall from the power tool.
3. Ignite your butane or propane torch, and slowly pass the flame over the built up material until it burns and hardens to brittle char.
4. Using the hand wire brush, scrape away any excess buildup that's caught in the teeth.
5. Repeat burning and brushing as many times as necessary until the teeth are free of debris.
6. Allow the tool to slowly cool down to room temperature (do not quench in cold water immediately after burning).
7. Inspect the tool for excessive wear, broken teeth, etc. (replace if necessary)
8. Reattach to your power tool.
9. Carve on!
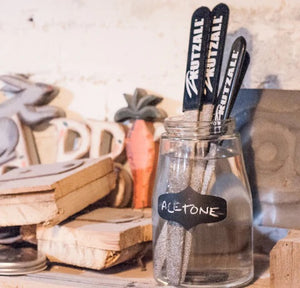
Soaking
Recommended for wood, stone, plastics, and composites
What you'll need: A well-used Kutzall tool, solvent capable of breaking down your clogged material (mineral spirits, turpentine, or acetone work well), large glass container, fine wire brush, dusk mask or respirator, leather gloves, eye protection.
SOAKING STEP-BY-STEP
1. Unplug the power source and remove your Kutzall from the power tool.
2. Fill a large glass container with your solvent of choice in a well ventilated area.
3. Submerge the clogged part of your Kutzall tool in the solvent (Note: do not submerge the rubber handle of a Kutzall hand rasp).
4. Allow the solvent adequate time to soak into and penetrate the built up material. This can take several hours.
5. Remove the soaked tool from the container and firmly scrape the clogged material away with the wire brush.
6. Repeat soaking and scraping as many times as necessary until the teeth are free of debris.
7. Wash the solvent off of your tool using soap and water and dry thoroughly.
8. Inspect the tool for excessive wear, broken teeth, etc. (replace if necessary).
9. Reattach to your power tool.
10. Carve on!